In my previous post I wrote about process of pre deployment. A common question was about the deployment process itself. And the idea of this blog was born. The following is a non exhaustive common list of ways to deploy to cloud.
- In a single VM instance. For eg. Droplet(Digital Ocean), EC2(AWS), Compute Engine(GCP), etc.
- In one or more VM instances with autoscaling. Not all cloud providers currently support this. AWS, GCP and Azure currently does it.
- Managed Kubernetes Service (Supported by most common coud service providers) - Kubernetes is a way to deploy docker containers as seperate services. This is an extremely popular option for microservices architecture.
- Elastic Container Service - A proprietary service from AWS which is similar to Kubernetes but much less complicated.
For our use case we will be using option 2 - an Auto Scaling Group in AWS to show how the deployment should be done. AutoScaling Groups will cover most common scenarios as well as be cost efficient. We will be using AWS Console to setup the AutoScalingGroup and the focus will be only to how to get the setup up and working. Aspects like security, optimal scalability is beyond the scope of this article.
Pre Requisites
This example will be using a docker-compose.yml and Dockerfile. How to create those files is outside the scope of the blog and is expected to be part of your codebase. The steps in this post also requires a basic idea of AWS Services like EC2, Application Load Balancer, IAM, CodeDeploy and CodePipeline.
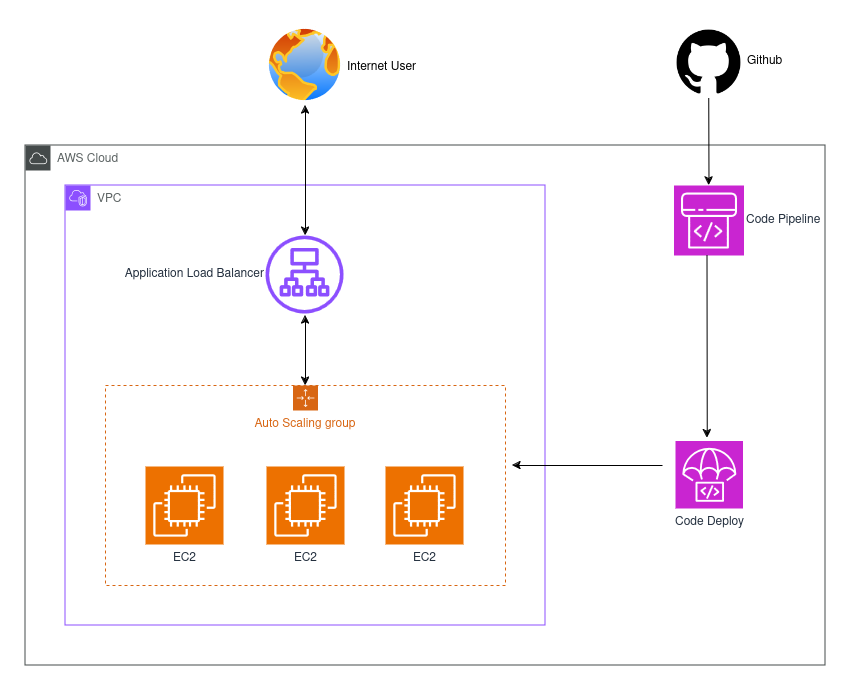
Architecture Diagram
 A simplified architecture diagram of the stack we will be setting up
Launch Templates
- Login to your AWS Account and lets start by setting up a Launch Template. A launch template is a newer form of launch configuration where we specify the configuration that will be used by the AutoScalingGroup to launch any instance.
- Add the details as requested in you preferred region. For my template, I set the region as ap-south-1(Mumbai). I used an
Ubuntu 24.04image, at2.microinstance,gp3EBS storage. I also created a new security group seperately and then selected that for the template. - In the advanced options we need to add docker installation in user data. Alternatively, you can create an AMI with docker pre installed and select it for launch template. This will allow faster scale ups.
Note: For folks not using AWS Free Tier, I would recommend using t3a/t4g instance types as they are significantly cost efficient.
AutoScalingGroup
AutoScalingGroup is way to increase or decrease number of EC2 instances deployed based on predefined condition. The creation of new instances is based on the launch template image defined in the previous section.
- Once the Launch Template is created we can create AutoScalingGroup by selecting the template and selecting
Create Auto Scaling groupfrom theActionsdropdown. - Provide the AutoScalingGroup name and then proceed.
- Select the
vpcandavailbility zonesandsubnetsfrom which you want instances to be created. AZs might be limited based on your instance type as well. As part of advanced options you will be asked about load balancer configuration. - Attach to a new application load balancer that is internet facing. Create a new target group unless that already exists. Enable health checks, cloudwatch metrics collection and proceed to next screen.
- Set up a target tracking policy, for eg. CPU utilization > 50% and set the min, max and desired no. of instances. Desired instances is the default number of instances when the system is not scaling out or scaling in.
- In the subsequent steps you should be able to add notifications via SNS and add tags. Finally, review your configuration and then create the AutoScalingGroup.
CodePipeline
Now that our AutoScalingGroup is up, we need to create a pipeline that will deploy our code to each instance. CodePipeline involves setting up CodePipeline, CodeBuild and CodeDeploy. However, in our case we can skip CodeBuild as we will not be needing it. Before, setting up the pipeline we need to add the CodeDeploy settings. Follow the below steps.
- Create a CodeDeploy Service Role from AWS IAM.
- Create an application in CodeDeploy and choose compute platform as EC2/On Premise.
- Create a deployment group and add the role created in step 1 for service role.
- For this example we will be using in-place deployment type.
- Select Amazon EC2 AutoScaling Groups for Environment Configuration and enable application load balancer in the configurations.
- Add a appspec.yml as described here. Depending on the hooks being used, you have to add the relevant bash scripts for the steps. If using docker compose you should be able to just run
docker compose downanddocker compose up --build -din one of the hooks. - Finally, create the pipeline. If using Github, you can select source provider as as Gihub Version 2. Add the relevant Github connection, repository and branch details.
- If you are using docker compose, you can skip the build stage.
- Review the changes and create the pipeline.
Yay! Your pipeline should now be complete and you should be able to see deployments initiated. 🥳
Conclusion
This is by no means a fully optimized solution. There are aspects like RDS setup, security, secret management, env variables which are recommended to be configured before running a production setup. This post is intended to help setup an initial usable, practical and cost efficient setup. So go ahead and try it, and let me know your feedback in the comments below.